Keil with GNU CodeSourcery for Cortex-M3 TI EvalBot
Table of Contents
- 1. Prerequisites
- 2. Download & install the CodeSourcery CodeBench Lite toolchain
- 3. Install StellarisWare for the EvalBot
- 4. Configuring the Keil UVision
- 4.1. The
qs-autonomousproject - 4.2. Change compiler toolchain path (
Components, environements & books) - 4.3. Setup of the
Options for Target... - 4.4. Setup Listing
- 4.5. Setup User
- 4.6. Setup CC
- 4.7. Setup Linker
- 4.8. Setup Debugger & ICDI
- 4.9. Remove Keil library
- 4.10. Replace
startup_rvmdk.Sbystartup_gcc.c - 4.11.
strlen()call fromdisplay96x16x1.c
- 4.1. The
- 5. Build all
- 6. VirtualBox Virtual Machine
This tutorial describes how to configure the UVision Keil programming environment to use the GNU CodeSourcery CodeBench toolchain. The target I am using in the tutorial is the Texas Instruments EvalBot. The target is equiped with a LM3S9B92 Cortex-M3 microcontroler.
1. Prerequisites
I assume that you already have the evaluation version of the Keil UVision installed and working on your Windows computer for the EvalBot target. This suite comes with its own ARM toolchain.
2. Download & install the CodeSourcery CodeBench Lite toolchain
Download the CodeSourcery CodeBench Lite toolchain from their site
(~100MB file, weights ~150MB on HD). Be sure to pick the EABI
Release for the ARM processors for Windows. This version is to
develop in C/C++/Assembler on a bare metal target (that is without an
Operating System) and includes gcc, as, ld, gprof, gdb and
lots of other things.
Install the toolchain. It usually goes to the default directory
C:\Program Files\CodeSourcery\Sourcery_CodeBench_Lite_for_ARM_EABI.
Note that you have a load of documentations about all the included
tools in PDF, HTML and other formats available in the sub directory
share\doc\arm-arm-none-eabi
3. Install StellarisWare for the EvalBot
This is not absolutely necessary, as you may work with your own
sources, but we are going to install the StellarisWare for the EVALBOT
Software Development Package from TI which brings a load of examples
and we'll pick one of them to setup the configuration of the Keil
Environement. Download from the page above an executable file
SW-EK-EVALBOT-9453.exe which weights ~16MB (~65MB on HD) and usually
installs to C:\StellarisWare.
In the boards\ek-evalbot subdirectory, you will find examples to
experiment with the EvalBot platform and the Cortex-M3. These examples
come with the necessary files to be used in different environments,
including Keil, CodeSourcery, Code Composer Studio, as well as GNU
toolchain.
We will pick the qs-autonomous example which is a nice demo of the
features of the EvalBot platform.
4. Configuring the Keil UVision
I am using version 4.23 of the evaluation edition of the Keil UVision Development suite. Screens may differ slightly if you have another version, but the principle should remain the same.
4.1. The qs-autonomous project
Open the qs-autonomous project in Keil UVision. You may work on a
copy of the directory if you want to keep the original unchanged. If
you do so, make the copy in the same directory, because we will need
some dependencies later.
The project files should compile, but the link fails because the size of the project exceeds the 32K limit of the evaluation version.
4.2. Change compiler toolchain path (Components, environements & books)
Open the Components, environements & books dialog box (also
available under the Project > Manage >... menu). In the
Folders/Extensions tab:
- check
Use GCC - set the
Prefixtoarm-none-eabi- - set the
Folderaccording to the path where you installed the CodeSourcery toolchain.
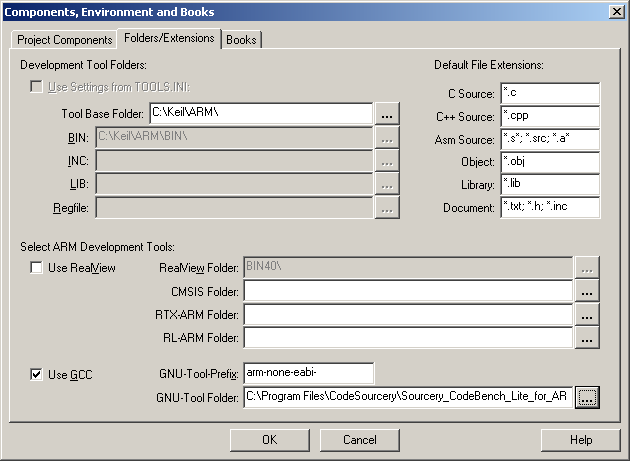
Figure 1: Selecting GNU CodeSourcery toolchain
Optional: In the Books tab update and/or add the links to the
gcc, as, ld and other docs from your CodeSourcery install.
4.3. Setup of the Options for Target...
This dialog box is also available from the Project > Options for
Target menu.
I assume that you already picked LM3S9B92 in the Device tab.
In the Output tab:
- you may check
Debug informationto include the necessary symbols to make debugging easier - you may change the name of the executable of your program
- you should
Select Folders for Objects...the subdirectorygccwithin the project directory to avoid mixing different object files form different compilers.
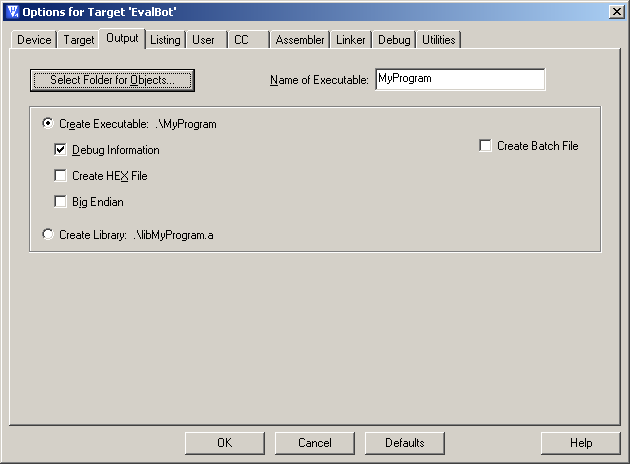
Figure 2: Options for Target > Output
4.4. Setup Listing
Select the type of listing that you want. You should Select Folder
for Listings... the gcc subdirectory as well to avoid mixing output
listings from other compilers.
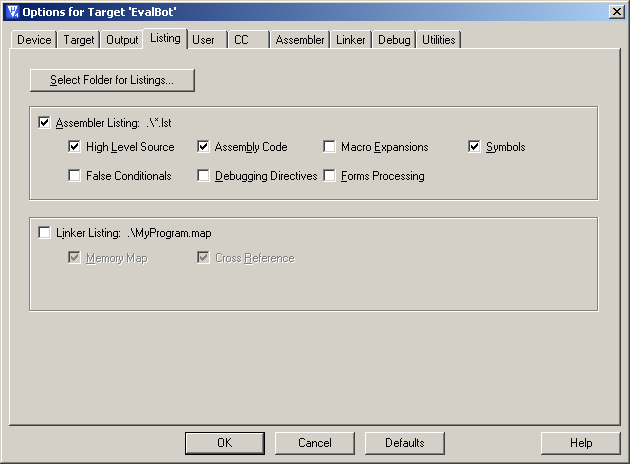
Figure 3: Options for Target > Listing
4.5. Setup User
Optional: You may execute some command before or after build. The
flashing tool from TI is able to flash directly the .elf executable
file format that gcc will generate into the memory of the target. In
case you are using another flashing tool which does not support this
format but instead requires a pure binary image of the executable, you
may add the following command to generate such a binary:
arm-none-eabi-objcopy -Obinary gcc/qs-autonomous.elf gcc/qs-autonomous.bin
Note that we assume that you added to your path the CodeSourcery
executables that you installed, otherwise, you will have to set the
entire access path to the arm-none-eabi-objcopy command.
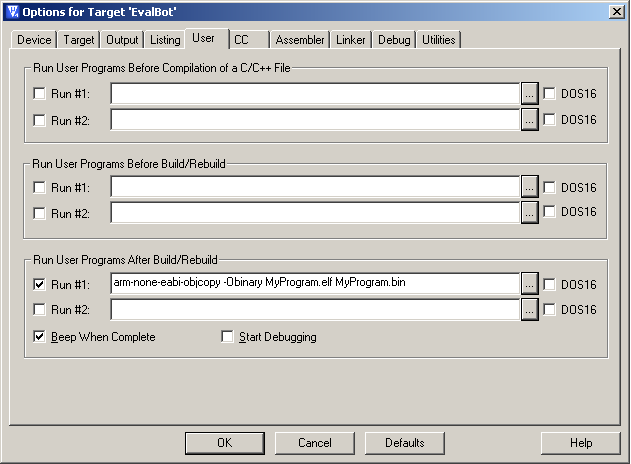
Figure 4: Options for Target > User
4.6. Setup CC
Several important things to note about the CC tab:
- The
Definewill depend on your project, the ones on the figure are the required ones for theqs-autonomousproject:TARGET_IS_TEMPEST_RB1UART_BUFFEREDPART_LM3S9B96 - You MUST check
Compile Thumb Code APCSis the ARM standard to perform function calls between C and assembler, it does not harm to check it…- Choose
No Optimizationif you want to debug your code by stepping C source together with assembler. If you optimize, gcc will generate a twisted assembler code which will be very far from your original C source, making it really difficult to step them together. Include pathmust be.;..\;..\..\..\for theqs-autonomousproject, you will obviously have to adapt this to your own project.
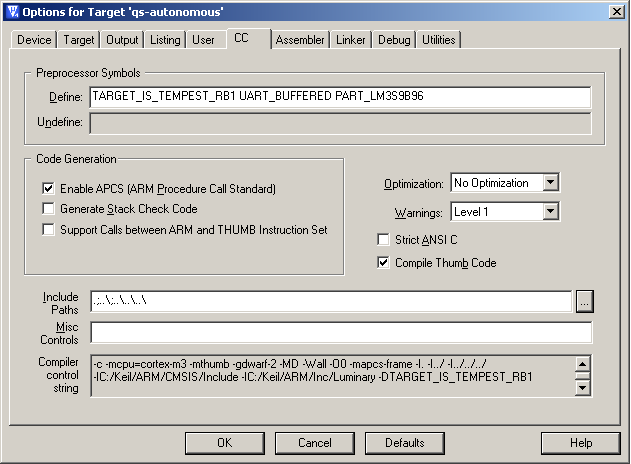
Figure 5: Options for Target > CC
4.7. Setup Linker
There is nothing special to check in the Assembler tab for this
project.
In the Linker tab:
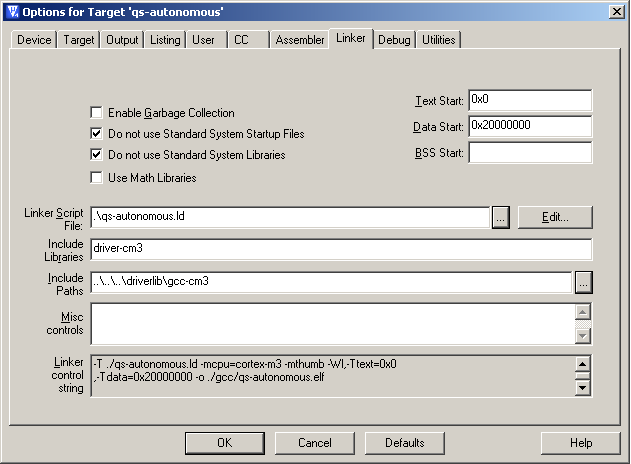
Figure 6: Options for Target > CC
- Be sure to check
No Standard System Startup FileandNo Standard System Libraries - No need for math lib in our project
Text StartMUST be0x0otherwisegccis called with an empty-Wland fails. We might as well setData Startto0x20000000for coherency.- The project needs a library
libdriver-cm3.a. TI included the GNU GCC compiled version so there is no need to recompile it with GCC. Just set theInclude Pathto..\..\..\driverlib\gcc-cm3and theInclude Librariestodriver-cm3. ldneeds a script which describes where to put what and how into the memory of the target. This script can be quite complex. Fortunately, TI gives us one in the project folder that you just need to select: qs-autonomous.ld.You can find very good explanations about this script by reading the
lddocumentation (included in the CodeSourcery you installed) or on this excellent page. It deals with the STM32, another Cortex-M3 development kit by ST Microelectronics, but all the explanations remain valid in our case as well.
4.8. Setup Debugger & ICDI
To debug your program on the target using TI Stellaris ICDI, you need
to set these. Specially, do not forget to check Program and
Verify of the Flash section. It should be already set if your
environment was correctly configured, that is the TI drivers
installed, and the target attached and you have already debugged
programs on your EvalBot.
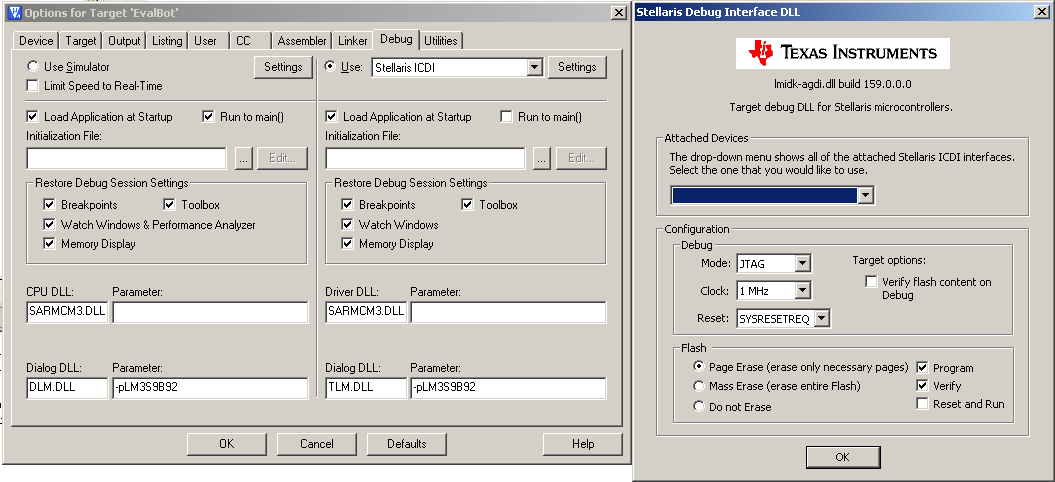
Figure 7: Options for Target > Debug
4.9. Remove Keil library
As we included the GCC binary of the library libdriver-cm3.a
(Linker tab), we have to remove the Libraries folder from the
resources in the Project windows on the left: Right click on the
Libraries and Remove Group Libraries....
4.10. Replace startup_rvmdk.S by startup_gcc.c
The source file startup_gcc.c performs all necessary initialization
tasks to execute your C program, for example:
- initializing a stack pointer
- initializing an interrupt vector table
- initializing the BSS section to 0
- copying the initialized variables from the flash to the SRAM
- initializing a Reset vector which will ultimately execute your
main()entry point at the end of the initialisation.
This source is very important, is usually specific to the compiler
and quite complex to write. Fortunately, TI had the good idea to
include a startup_gcc.c file for GNU GCC that we are going to use.
So remove the Keil startup_rvmdk.S file from the project sources:
right click on it in the left window (Project) and Remove File....
Then right click on Source and Add Files to Group Sources....
Select startup_gcc.c from the project directory.
The source startup_gcc.c can be downloaded from this link and
explanations can be found from the excellent page already mentioned.
4.11. strlen() call from display96x16x1.c
The source file display96x16x1.c calls the string function
strlen(). You just need to replace this line:
ulLen = strlen(pcStr);
by this one:
for (ulLen=0;pcStr[ulLen];ulLen++);
If you want to keep the original source unchanged, just remove the
display96x16x1.c file from the Sources, make a local copy into the
project directory, add it to the sources of the project, and edit this
local copy.
5. Build all
The project should now build. You can debug it on the target. You cant execute it into the simulator due to the 32K limit of the evaluation version of the Keil environment.
6. VirtualBox Virtual Machine
This tutorial works with windows in a VirtualBox Virtual Machine. You need a version of VirtualBox which support USB Host connection.