

Next: Commands
Up: MC68000 and interface circuits
Previous: Introduction
Contents
Subsections
To start the simulator just put the sim68k file in a directory
which is in your path and type sim68k. You can open a binary
68000 file by typing sim68k <filename.s29>
The files executed (source-ed) at startup are:
- The configuration file which main purpose is to defines the
hardware: memory, interfaces. The system file is located in
<install_path>/sim68k.cfg or in the environment variable
SIM68K_CONFIG.
- A file located in <install_path>/sim68k.start or in
the environment variable SIM68K_START which contains all
what you want to execute once the simulator is configured and
before you get the control back. You can perform here any
initialization of your choice, like customization of the GUI
(keyboard bindings)
- If it exists and is readable, the file ~/.sim68k is
sourced
- If it exists and is readable, the file ~/.sim68k.windows
is sourced, otherwise, the simulator sets the windows to a default
geometry
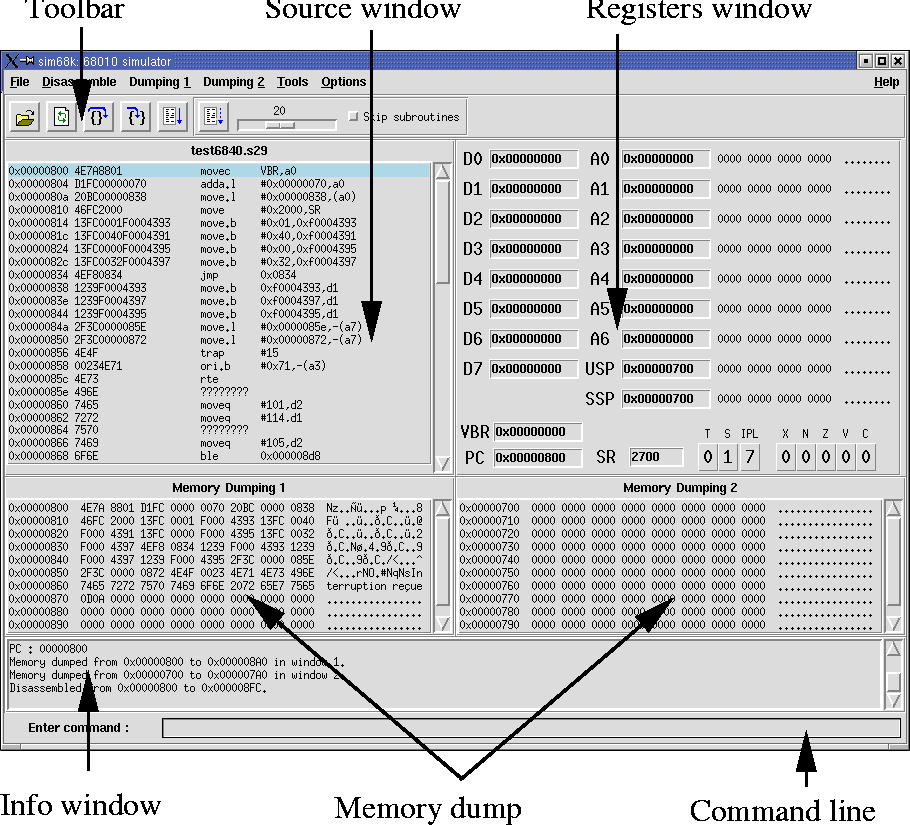
The function of the components of the graphical interface should be
mostly self-explanatory. There are menus, a toolbar, a source window,
the registers, two memory dump, a command window to input commands and
an info window to output message about the state or action of the
simulator. Please see figure 1.
Figure 1:
sim68k Graphical User Interface components
|
|
The source window contains the code disassembled. The line
corresponding to the current Program Counter PC has a
blue-sky background. You can set breakpoints in your assembler source.
The line corresponding to a breakpoint has its text written in dark
blue.
Click on the mouse button in the source window has the following
action :
- Left button:
- sets the PC on the specified line
- Middle button:
- Toggle breakpoint on the specified line
- Right button:
- Pop-up menu which proposes the actions above
The register window displays the registers. The first eight bytes of
the address pointed by the address registers are displayed on their
right. You can change the format of display (left-click on the name of
the register): a pop-up menu will appear to propose Hex (hexadecimal
base), Dec (decimal base) or Bin which will dump the binary form of
the register to the info window.
The flags of the Status Register are extracted, and you can set or
clear them individually by clicking on it and choosing the command in
the pop-up menu.
You can change the value of the register by clicking on them, typing
in a numerical value and then return. If the entered value is correct,
it will be displayed as the new value of the register. The syntax is
case-insensitive and accepts most of the common numerical syntax (see
table 1).
Table 1:
Syntaxes for numerical input to change the registers
| decimal |
123789 |
| octal |
012345, @12345 |
| hexadecimal |
0xC1afE, $C1afE, 0C1afEh |
| binary |
%0110110, 0110110b |
|
The toolbar represented in figure 2 includes several buttons.
Figure 2:
Toolbar of the simulator
|
|
- Open File:
- load a binary .s29 file into the memory of the
simulator
- Reload:
- load a binary .s29 file into the memory of the
simulator
- Next:
- execute one instruction, skipping subroutine (JSR
and BSR)
- Step:
- execute one instruction, stepping into the subroutines
- Run:
- run the code but do not update the GUI of the 68000. The
button is automatically replaced by a Stop button which you
can press to interrupt the program. The program runs significantly
faster in this mode. A breakpoints stops the execution of the program.
- Trace:
- run the code and update the GUI at each instruction. You
can tune the speed of the execution and skip the subroutines if you
check the corresponding button. You can press the Stop button
to interrupt the program. A breakpoints stops the execution of the
program.
The function of the menus should be quite self-explanatory. Let us
just present the Tools and Options submenus.
The tools submenus displays the table of the Exception Vector
in a new window, see figure 3
Figure 3:
Exception vector table
|
|
The Options menu offers the following entries :
- notify IPL:
- display a message in the info window when an IPL occurs
- notify other exception:
- display a message in the info window
when other exceptions than IPL occurs
- Stop if IPL:
- in Run or Trace mode, stop the
execution if an IPL occurs
- Stop if other exception:
- in Run or Trace mode,
stop the execution if an other exceptions than IPL occurs
- Display Labels:
- toggle the display of the labels or the
hexadecimal code of the instruction on the column on the right of the
address in the source window
- Source Follows PC:
- if this is set while in Trace mode,
the simulator will arrange for the PC to be always visible in the
source windows
- Save current as default:
- save current options settings into the
file ~/.sim68k which will be automatically sourced at startup
next time to resume the same options


Next: Commands
Up: MC68000 and interface circuits
Previous: Introduction
Contents
PERROTON Laurent
2003-01-28
