A control is a specific input element on a device (such as a key, button) that can produce an input signal, for example:
<Keyboard>/space
<Mouse>/leftButton
<Gamepad>/leftStick
The Unity Input System provides a unified naming scheme for controls, allowing the same bindings to work across different consoles, mouses and gamepads:
The Unity Input System uses standardized names for gamepad controls:
Unity Input System
Xbox
PlayStation
Nintendo Switch
<Gamepad>/buttonSouth
A
Cross (✕)
B
<Gamepad>/buttonNorth
Y
Triangle (△)
X
<Gamepad>/buttonWest
X
Square (□)
Y
<Gamepad>/buttonEast
B
Circle (○)
A
<Gamepad>/leftShoulder
LB
L1
L
<Gamepad>/rightShoulder
RB
R1
R
<Gamepad>/leftTrigger
LT
L2
ZL
<Gamepad>/rightTrigger
RT
R2
ZR
<Gamepad>/start
Menu
Options
+
<Gamepad>/select
View
Share
-
<Gamepad>/leftStickPress
LS
L3
Stick press
<Gamepad>/rightStickPress
RS
R3
Stick press
To clarify the naming, the following diagram shows the standard control names for an Xbox gamepad:
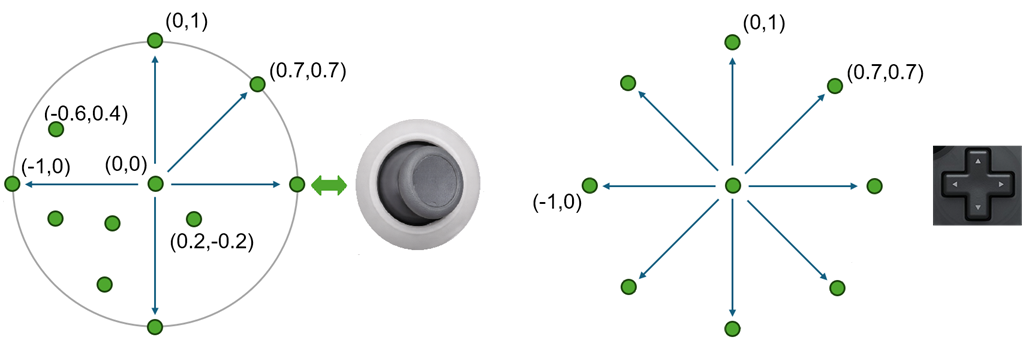
Warning: In Unity, leftStick refers to the stick located on the left side of the gamepad, not to the stick being pushed to the left. Leftstick and rightstick are analog controller that return a 2D vector describing the direction of the stick. The directional pad is a discrete directional control that can return only nine possible directions.
The directional pad can be used either as a 2D directional control using <Gamepad>/dpad or as four individual buttons: <Gamepad>/dpad/up, <Gamepad>/dpad/down, `<Gamepad>/dpad/left, and <Gamepad>/dpad/right but not simultaneously.
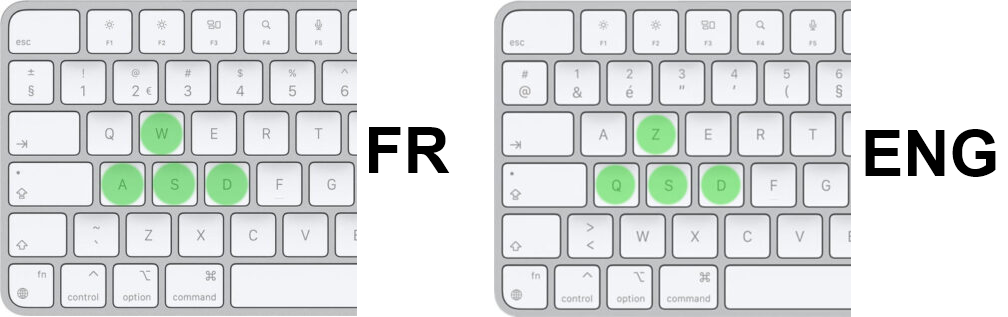
As you know, a game is distributed internationally, which means it must work with any keyboard layout. To handle this issue, two approaches can be used for choosing a control:
By the physical Location of the key on the keyboard
By the character: 'A', 'b'…
The first approach is commonly used in games. This way, whether you are using a French or an English keyboard, the keys used for movement (ZQSD or WASD) are located in the same physical positions. The second approach is better suited for text input, such as a chat or a text field, where the character produced by the key is what matters most.
Avertissement
To locate a key on the keyboard, the system does not use an ID or coordinates. Instead, it uses the character ('A', 'M'…) associated with the key in the US keyboard layout. This may create confusion between the key location system and the character-based system.
In practice, a production-ready game defines different Action Maps for different gameplay contexts such as walking, swimming, or driving.
Each map contains the actions and bindings relevant to that context.
Note
In the program, the code you write only interacts with actions. Keyboard, mouse, or gamepad inputs are no longer handled directly. This abstraction makes the action logic independent from the underlying hardware.
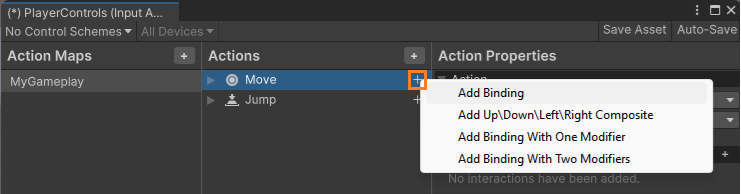
An input control can be linked to an action in 3 differents ways, depending on the number of controls that must be pressed: 1 2 or 3
Another type of binding is used to handle directional input. It allows keys such as WASD (or ZQSD-fr) or a gamepad stick to generate a Vector2.
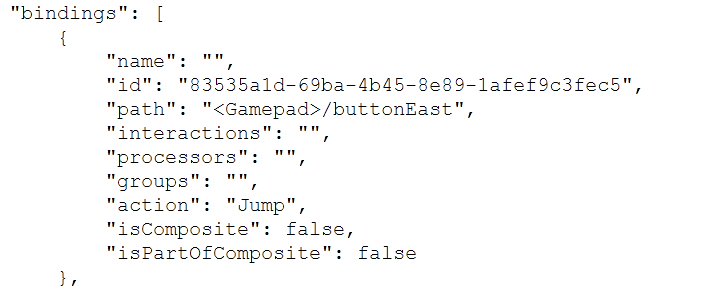
In the Assets folder, open the file associated with your PlayerControls asset in a text editor. You will notice that it is a JSON file containing all the required information.
During the game, we can provide a UI to change bindings. In that case, a script can apply binding overrides at runtime:
Finally, we save the current binding overrides to a JSON string (or a file) to persist the player’s custom bindings, and reload them the next time the game starts.