Feature Extraction#
To prepare the dataset for training, you will extract features from each image using the following pipeline.
Dominant Colors
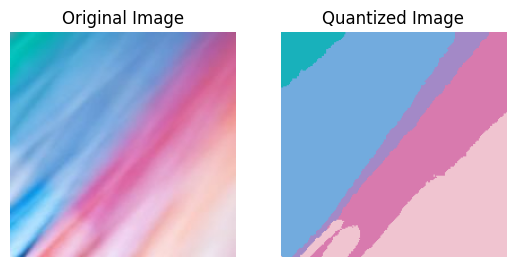
The 5 dominant colors of an image are extracted using the K-Means clustering algorithm.
Each pixel in the image is then replaced with the nearest dominant color.
Optionally, the spatial arrangement of pixels is shuffled.
Pretrained Model
MobileNetV3-specific preprocessing is applied to the quantized image.
The resulting image is passed through the convolutional backbone and the global average pooling.
The output is flattened to obtain a fixed-length (960) feature vector.
Feature Caching
The extracted feature vectors are precomputed for all images in the dataset and stored on disk.
Each step is explained below. Code snippets are provided as a starting point for your implementation.
Dominant Colors#
The first step is to process an image so that only the 5 dominant colors are retained. Download the following files and put them in your working directory.
Import the class BuildMosaic from mosaic.py. This is a PyTorch transform that expects the input to be a tensor of shape (3, H, W) or (B, 3, H, W), where B is the batch size, H is the height, and W is the width of each image. The image pixels are expected to be in the RGB color space with uint8 values in the range [0, 255] or float32 values in the range [0, 1]. The output is a tensor of the same shape as the input.
The following code demonstrates how to build a minimal PyTorch pipeline with BuildMosaic.
from torchvision.transforms import v2
from mosaic import BuildMosaic

process_fn = v2.Compose([
    v2.ToImage(),
    BuildMosaic(),
])
The figure below shows the original image on the left and the transformed image on the right.
Show code cell source
import PIL
import matplotlib.pyplot as plt
import torch
torch.manual_seed(0)

orig_image = PIL.Image.open('.data/images/Blue-Pink/000002.jpg')

out_image = process_fn(orig_image)

plt.subplot(1, 2, 1)
plt.imshow(orig_image)
plt.title('Original Image')
plt.axis('off')

plt.subplot(1, 2, 2)
plt.imshow(out_image.permute(1, 2, 0))
plt.title('Quantized Image')
plt.axis('off')

plt.show()

Pretrained Model#
The second step is to extract features from the quantized image using a pretrained MobileNetV3. The following code demonstrates how to import the model and define a pipeline that includes BuildMosaic and the MobileNetV3 preprocessing.
from torchvision.models import mobilenet_v3_large, MobileNet_V3_Large_Weights
from torchvision.transforms import v2
from mosaic import BuildMosaic

# Load the model in evaluation mode
weights = MobileNet_V3_Large_Weights.DEFAULT
preprocess = weights.transforms()
mobilenet = mobilenet_v3_large(weights=weights)
mobilenet.eval()

# Modify the preprocessing pipeline
preprocess_adapted = v2.Compose([
    v2.ToImage(),
    BuildMosaic(shuffle=False), # or =True to shuffle the pixels
    preprocess,
])
The feature extraction is performed as follows for a batch of images.
image_batch = torch.randint(0, 255, (10, 3, 300, 300), dtype=torch.uint8)
image_batch = preprocess_adapted(image_batch)

with torch.inference_mode():
    output = mobilenet.features(image_batch)
    output = mobilenet.avgpool(output)
    output = torch.flatten(output, 1)

print('Input size:', *image_batch.shape)
print('Output size:', *output.shape)
Input size: 10 3 224 224
Output size: 10 960
Feature Caching#
The final step is to extract features from all images in the dataset and store them on disk.
Load the dataset with
ImageFolderusingpreprocess_adaptedas the transform.Create a
DataLoaderto iterate over the dataset.Loop over the dataset to extract features. Store them and the corresponding labels in two separate lists.
After the loop, convert the lists to PyTorch tensors and save them to disk using
torch.save.
Afterwards, you can load features and labels with torch.load to create a TensorDataset.
import torch
from torch.utils.data import TensorDataset

features = torch.load('.data/features.pt')
labels   = torch.load('.data/labels.pt')

feature_ds = TensorDataset(features, labels)
