
Building a Neural Network#
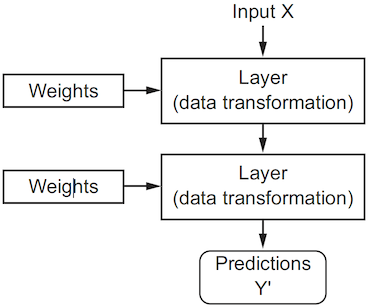
Neural networks are a class of machine learning models designed around the idea of processing data through layers of interconnected neurons. PyTorch provides a flexible and powerful API for building such networks. The module torch.nn includes a wide range of pre-built layers, activation functions, and loss functions, making it easy to construct complex neural networks with minimal code. In this tutorial, we will explore the key components for building neural networks in PyTorch.
import torch
from torch import nn
import torch.nn.functional as F
Fully-connected layer#
Many types of layers have been designed since the inception of neural networks, each with its own characteristics and use cases. The simplest type is the fully-connected layer, meaning that each neuron in one layer is connected to every neuron in the next layer. These connections have associated parameters that are combined with the input to produce the output of the layer.
Formula#
A fully-connected layer has a state that is determined by a weight matrix and a bias vector. Given these parameters, a fully-connected layer transforms the input tensor into the output tensor using the linear transformation expressed below.
output = input @ weight.T + bias
Let’s unpack this formula.
The input is a tensor of shape
(..., in_dim), where...represents any number of dimensions preceding the last axis of sizein_dim.The weight matrix is a tensor of shape
(out_dim, in_dim)and the bias vector is a tensor of shape(out_dim,), whereout_dimis the number of neurons of the layer.The multiplication (
@) between the input tensor and the transposed weight matrix produces an array of shape(..., out_dim), where...matches with the dimensions of the input tensor, excluding the last axis. The layer operates on the last dimension and considers all the preceding ones as batch axes.The bias vector is then added to the result of the matrix multiplication. Broadcasting rules apply to this operation, meaning that the bias vector is expanded to match the shape
(..., out_dim).
Example#
Let’s create a fully-connected layer with 4 inputs and 7 outputs. We will use the class nn.Linear, which internally creates a weight matrix and bias vector and initializes them to small random values. PyTorch’s default initialization is scaled to the input width so activations do not immediately become enormous.
# Arg 1: number of input features
# Arg 2: number of output features
layer = nn.Linear(4, 7)
Any tensor with shape (..., 4) can be passed through this layer, and the output will have shape (..., 7). Note that ... can be any number of leading dimensions, including none.
x = torch.randn(2, 5, 4)
y = layer(x)

print(y.shape)
torch.Size([2, 5, 7])
Parameters#
We can access the weight matrix and bias vector using the weight and bias attributes of the layer.
w = layer.weight
b = layer.bias

print('Weights size:', *w.shape)
print('Bias size:', *b.shape)
Weights size: 7 4
Bias size: 7
Another way to access the parameters is by using the method parameters() or named_parameters(), which return an iterator over all the parameters of the layer.
for name, param in layer.named_parameters():
    print(f"{name} | {param.size()} | {param} \n")
weight | torch.Size([7, 4]) | Parameter containing:
tensor([[ 0.0394, -0.1075, -0.3995, -0.3328],
        [-0.4410, -0.3885,  0.1359,  0.4174],
        [ 0.4275, -0.1114,  0.1819,  0.0272],
        [ 0.4791,  0.2125, -0.0978, -0.0300],
        [-0.1784,  0.3714,  0.4609, -0.0311],
        [-0.1075, -0.4183, -0.1969, -0.0642],
        [ 0.4890,  0.2908, -0.0243,  0.2695]], requires_grad=True)

bias | torch.Size([7]) | Parameter containing:
tensor([ 0.0374, -0.2211,  0.2743, -0.3405,  0.0902, -0.4130,  0.2662],
       requires_grad=True)
Other layers#
PyTorch provides a wide range of layers that can be used to build neural networks. Let’s briefly discuss two (parameter-less) layers that we will use later to build a simple neural network.
Flatten layer#
The nn.Flatten layer reshapes the input tensor into a 2D tensor, where the first dimension is the batch size and the second dimension is the product of all other dimensions. This is useful for preparing the input for a fully-connected layer, which expects a 2D tensor. The Flatten layer does not have any parameters and does not change the values of the input tensor, only its shape.
flatten = nn.Flatten()

x = torch.randn(2, 1, 28, 28)
y = flatten(x)

print(y.shape)
assert y.shape == (2, 784)
torch.Size([2, 784])
ReLU activation#
The nn.ReLU layer implements the activation function \(\max(x,0)\), which is applied element-wise to the input tensor and does not have any parameters. Without a nonlinear activation, several linear layers collapse mathematically into one linear transformation, no matter how deep the stack appears.
The ReLU activation function is commonly used in neural networks because it avoids the broad saturation regions of sigmoid or tanh, which are known to cause the vanishing gradient problem. Its tradeoff is the “dead neuron” problem, where neurons can become inactive and stop learning if they output zero for all inputs. However, it is still widely used in practice due to its simplicity and effectiveness. Alternatives such as LeakyReLU, GELU, and SiLU make different smoothness and gradient tradeoffs.
relu = nn.ReLU()

x = torch.randn(2, 3)
y = relu(x)

print(x, "\n")
print(y)
tensor([[-0.9678, -0.0252,  0.9402],
        [ 0.3031, -0.4867, -1.0145]])

tensor([[0.0000, 0.0000, 0.9402],
        [0.3031, 0.0000, 0.0000]])
Sequential model#
The nn.Sequential class allows us to create a neural network by stacking layers in a sequential manner. This is useful for building feedforward networks, where the output of one layer becomes the input of the next layer. The Sequential class takes a list of layers as input and returns a new layer that applies the given layers in sequence. The input to the first layer is the input to the network, and the output of the last layer is the output of the network.
To solve MNIST, we use a network with the following architecture:
The input of the network is any tensor that can be flattened into a 784-dimensional vector (784 = 28 * 28 is the size of the MNIST images).
The first fully-connected layer has 512 neurons and ReLU activation.
The second fully-connected layer has 10 neurons and no activation.
The output of the network is thus a 10-dimensional vector, which represents the score (logit) of each digit class (0-9).
Note
For numerical stability, the softmax activation is removed from the last layer of the network. Pythorch combines the softmax directly into the loss function nn.CrossEntropyLoss.
The code below is the way of building such a network in PyTorch.
model = nn.Sequential(
    nn.Flatten(),
    nn.Linear(28*28, 512),
    nn.ReLU(),
    nn.Linear(512, 10),
)
Using the model#
The nn.Sequential class returns an object that behaves like any other layer, meaning that it can be called with an input tensor to produce an output tensor. The input tensor is passed through each of the layers in the network, and the output of the last layer is returned as the result. The input tensor must have the correct shape for the first layer of the network, otherwise an error will be raised.
x = torch.randn(5, 784)
y = model(x)

print(y.shape)
assert y.shape == (5, 10)
torch.Size([5, 10])
Model parameters#
The method .parameters() returns an iterator over all trainable parameters of the network, which are the weight matrices and bias vectors of the fully-connected layers. This method is convenient for gathering all the parameters that need to be updated during training. The method .named_parameters() works similarly, but also returns the names of the parameters, which is handy for debugging.
Note
Parameter counting is a useful sanity check: a linear layer with in_dim inputs and out_dim outputs contains in_dim × out_dim weights plus out_dim biases.
print(model, '\n')

print('Parameters:')
for name, param in model.named_parameters():
    print(f"{name:8s} | Size:", *param.shape)
Sequential(
  (0): Flatten(start_dim=1, end_dim=-1)
  (1): Linear(in_features=784, out_features=512, bias=True)
  (2): ReLU()
  (3): Linear(in_features=512, out_features=10, bias=True)
)

Parameters:
1.weight | Size: 512 784
1.bias   | Size: 512
3.weight | Size: 10 512
3.bias   | Size: 10
General module#
The nn.Module class is the base class for all layers in PyTorch. It provides a convenient way to define custom layers and models by subclassing it and implementing the __init__ and forward methods. The __init__ method is used to define the parameters of the module, while the forward method is used to define the computation performed by the module. This allows for greater flexibility and control over the behavior of a neural network, compared to using the nn.Sequential class.
Here is the equivalent of the sequential model defined above, but using a custom module instead.
class SimpleNet(torch.nn.Module):

    def __init__(self, input_dim, num_classes):
        super().__init__()
        self.flatten = torch.nn.Flatten()
        self.linear1 = torch.nn.Linear(input_dim, 512)
        self.linear2 = torch.nn.Linear(512, num_classes)

    def forward(self, x):
        y = self.flatten(x)
        y = self.linear1(y)
        y = F.relu(y)
        y = self.linear2(y)
        return y
An instance of the network can be created via the class constructor. To use the model, we pass the input data to the __call__ method. This executes the model’s forward, along with some background operations.
Important
Do not call the method .forward() directly!
model = SimpleNet(28*28, 10)

x = torch.randn(5, 1, 28, 28)
y = model(x)

print(y.shape)
torch.Size([5, 10])
Running on device#
We want to execute our model on an accelerator when one is usable. The nn.Module.to() method moves the module and its parameters to a device. For this compact example, we select CUDA when available and otherwise use the CPU.
device = torch.device('cuda' if torch.cuda.is_available() else 'cpu')

print('Device:', device)
Device: mps
We can move the model to the selected device with .to(device), meaning that all the parameters of the model will be transferred into the device memory. The input data must also be moved to the same device before the forward pass, otherwise PyTorch raises a device-mismatch error. The training loop will handle that transfer batch by batch.
model = model.to(device)

for name, param in model.named_parameters():
    print(f"{name:15s} | Device: {param.device}")
linear1.weight  | Device: mps:0
linear1.bias    | Device: mps:0
linear2.weight  | Device: mps:0
linear2.bias    | Device: mps:0
Summary#
In this tutorial, we explored the use of fully-connected layers, activation functions, and the sequential model for stacking layers. Additionally, we discussed how to define custom modules by subclassing nn.Module, allowing for greater flexibility in designing neural networks. We built a simple multi-layer network for classifying MNIST digits, and we examined how to run the model on different devices, such as CPUs and GPUs.
When building a neural network, two key architecture decisions are:
how many layers to use,
how many neurons to chose for each layer.
Intuitively, the number of layers and neurons controls how much freedom we are allowing the network to have when learning internal representations. Having more neurons allows the network to learn more complex representations, but it makes the network more computationally expensive, and may lead to overfitting. Picking the right network architecture is an iterative process that requires experimentation and validation. While there are some best practices and principles you can rely on, only practice can help you develop an intuition for this.